Today here to play around with the SQL script and I try to revise my SQL script.
When come to date calculation, there is a build in function to calculate the date different. The function name is datediff(). How to use this function as it simple and you have to pass 2 value into this function and it will return the difference of day between the 2 value.
Example:
Value A: 2015-08-20; Value B: 2015-08-12 and the different of these2 day are 8
SELECT datediff('2015-08-20 00:00:00','2015-08-12') as 'dayto'
For today date there is a build in function too which is CURDATE()
In SQL if you want to get specific numbers of result return by SQL server you may using LIMITthen follow by the number of record.
Example to return 10 record.
Limit 10
Well the complete SQL script to get the top 4 nearest evetStartDate date from today as follow.
SELECT datediff(`evetStartDate`,CURDATE()) as 'dayto', `eventguid`,`eventName`,`evetStartDate`
FROM event
WHERE `evetStartDate` > NOW()
ORDER BY `evetStartDate` ASC
LIMIT 4"
Wednesday, August 12, 2015

Friday, August 7, 2015
Using Nano Editor to set static IP
Previously i have use to using GUI to change the IP address on Ubuntu, but now come to server and there is no GUI, so I have force to learn using command to change the IP address.
Here is the guide to set static IP address on Linux Ubuntu by using the Nano text editor.
eth0 is the network card name, as you have more than 1 network card, it may have few name. So make sure the name of the interface. you may verify your interface card by using the ifconfig to show the list of interface and interface details.
so you may manually to change the file by using the nano editor. Below is my example and please take note that the iface eth0 inet dynamic change to static.
after you complete change, press Ctrl + x to save the change. The editor will promt you
Save modified buffer (ANSWERING "No" WILL DESTROY CHANGES) ?
Type Y to accept the change then press enter to save the file.
After you save the config file, you may restart the interface to make change. Type below command to down the interface
sudo ifdown eth0
and
sudo ifup eth0
to up the interface.
Here is the guide to set static IP address on Linux Ubuntu by using the Nano text editor.
sudo nano /etc/network/interfaces
so do not miss out the s in interface word, else the Linux unable to recognize your command. Due to changing system setting, it may prompt you the password for root. Once you entered the password and you may see the something as below.
auto lo eth0
iface lo inet loopback
iface eth0 inet dynamic
so you may manually to change the file by using the nano editor. Below is my example and please take note that the iface eth0 inet dynamic change to static.
auto lo eth0
iface lo inet loopback
iface eth0 inet static
 address 192.168.1.101
 netmask 255.255.255.0
 gateway 192.168.1.1
after you complete change, press Ctrl + x to save the change. The editor will promt you
Save modified buffer (ANSWERING "No" WILL DESTROY CHANGES) ?
Type Y to accept the change then press enter to save the file.
After you save the config file, you may restart the interface to make change. Type below command to down the interface
sudo ifdown eth0
and
sudo ifup eth0
to up the interface.
LAMP Installation guide.
Finally finsh the development for the project. Now is the time to host the application on server. Due to cost saving concern, the application will host on a Linux node in VM. So LAMP is the choice we have decide to deploy and host the application. LAMP basically is the acronym of Linux, Apache, MySQL and PHP.
And now the LAMP is success installed.
As previously I am using the XAMPP to start the PHP project development on Window. So now I have to deploy all the file into this new Linux node.
It is quite difficult to me as I have little knowledge on Linux Ubuntu and all have to use command to perform the installation. After go through the installation, I found that it quite simple but 1 thing is you have to know the command and mind your typed text else the command unable to execute.
Before begin the installation, make sure that you have connect to internet.
So start with install Apache. Below is the command to install the Apache. You may just copy paste the command.
sudo apt-get install apache2
after install Apache, no need to rush to start the service. Let continue with install Mysql with command below.
sudo apt-get install mysql-server
And now install the PHP.
sudo apt-get install php5 libapache2-mod-php5
Well, we have finish the installation for Apache, MySQL and PHP. So now we going to start the service.
sudo /etc/init.d/apache2 restart
after start the Apache service, you may use a browser to test the service. You may just type http://ipaddressofthehost/ on web browser to test it. It will respond a success page with it works!
And now the LAMP is success installed.
Thursday, August 6, 2015
Window 7 Sharing issues with XP
For a network that with different OS version might have facing this issues as the older version of Windows unable to access the share folder on Window 7. The error message as below. For this error message we can know that it related to permission issues. So you might play around with the access right.
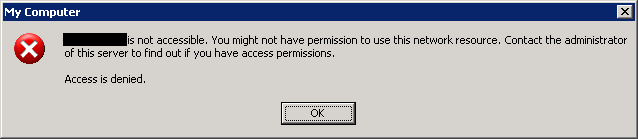
While you already make sure your access right is correct and the folder is accessible by Windows 7. This may be the window registry issues.
Solution:
1. Go the the particular Window 7 machine that sharing the folder. Locate to the following registry key and change it's value to 1. You may refer to this link for further study.
2. Locate this next key and change it to 3, this is just that "Server" service (or part of it) setting
Restart the Window 7 and now the problem should be solve.
While you already make sure your access right is correct and the folder is accessible by Windows 7. This may be the window registry issues.
Solution:
1. Go the the particular Window 7 machine that sharing the folder. Locate to the following registry key and change it's value to 1. You may refer to this link for further study.
HKLM\SYSTEM\CurrentControlSet\Control\Session Manager\Memory Management\LargeSystemCache2. Locate this next key and change it to 3, this is just that "Server" service (or part of it) setting
HKLM\SYSTEM\CurrentControlSet\Services\LanmanServer\Parameters\SizeRestart the Window 7 and now the problem should be solve.
Friday, July 3, 2015
C# with MySQL Error
Recently doing a project using c# connect to MySql server. For sure the connectio is require connection driver so that I have download and install the latest version of MySql connector version (6.9.6).
This is the first time I am using c# to establish the connection with the server. Some how I hit error during the development. So now here I am to share the issues and solution. And I aware that this is MySql connector bugs.
Here the Error
This is the first time I am using c# to establish the connection with the server. Some how I hit error during the development. So now here I am to share the issues and solution. And I aware that this is MySql connector bugs.
Here the Error
Description: An error occurred during the processing of a configuration file required to service this request. Please review the specific error details below and modify your configuration file appropriately.

Parser Error Message: Unable to connect to any of the specified MySQL hosts.

Source Error:


Line 283:    <siteMap>
Line 284:      <providers>
Line 285:        <add name="MySqlSiteMapProvider" type="MySql.Web.SiteMap.MySqlSiteMapProvider, MySql.Web, Version=6.9.6.0, Culture=neutral, PublicKeyToken=c5687fc88969c44d" connectionStringName="LocalMySqlServer" applicationName="/" />
Line 286:      </providers>
Line 287:    </siteMap>
Source File: C:\Windows\Microsoft.NET\Framework\v4.0.30319\Config\machine.config Line: 285
There is many solution say that if can resolve by commnet out the particular line of config in machine.config file. You may try this soltion since there is some people mention they albe to resolve it by this. The path of machine.config file as below:
C:\Windows\Microsoft.NET\Framework64\v4.0.30319\Config\machine.config
<!--        <add name="MySqlSiteMapProvider" type="MySql.Web.SiteMap.MySqlSiteMapProvider,

MySql.Web.v20, Version=6.9.3.0, Culture=neutral, PublicKeyToken=c5687fc88969c44d"

connectionStringName="LocalMySqlServer" applicationName="/" /> -->
Reference: http://bugs.mysql.com/bug.php?id=74080&thanks=1¬ify=71
But this solution not work for me.
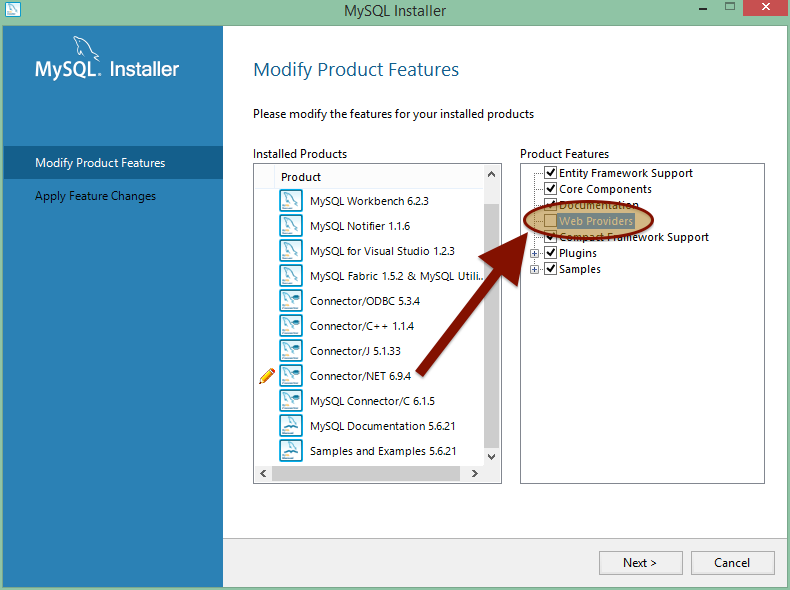
So the next solution is to change the installation file by go to control panel -> program -> select MySql connector and select change. un-check the web provider and next all the way. Then the issues resolve. Hope it help.
Friday, June 12, 2015
XAMPP Port Issues
When I want to start a PHP development project, I use to face port issues during setup the XAMPP. You will face this issues where the Skype, VM Ware, or team viewer installed in your PC. The port is utilize by these few software so that your Apache service is unable to start.
This problem can easily solve by changing the port number if Apache. Click on the Config button on the XAMPP Control panel that same row with the Apache service. It will show a menu and select the Apache (https.conf) and it will open the config file with notepad. Using find/search (Ctrl +F) to find port number 80 and change it to a free port and the port you prefer. In my example below i change it to 8088
Snippet for port 80.
# Change this to Listen on specific IP addresses as shown below to
# prevent Apache from glomming onto all bound IP addresses.
#
#Listen 12.34.56.78:80
Listen 8088
#
# Dynamic Shared Object (DSO) Support
And same goes to the secure port by choosing Apache (httpd-ssl.conf).
Snippet for SSL port number
# When we also provide SSL we have to listen to the
# standard HTTP port (see above) and to the HTTPS port
#
Listen 4443
##
## SSL Global Context

This problem can easily solve by changing the port number if Apache. Click on the Config button on the XAMPP Control panel that same row with the Apache service. It will show a menu and select the Apache (https.conf) and it will open the config file with notepad. Using find/search (Ctrl +F) to find port number 80 and change it to a free port and the port you prefer. In my example below i change it to 8088
Snippet for port 80.
# Change this to Listen on specific IP addresses as shown below to
# prevent Apache from glomming onto all bound IP addresses.
#
#Listen 12.34.56.78:80
Listen 8088
#
# Dynamic Shared Object (DSO) Support
And same goes to the secure port by choosing Apache (httpd-ssl.conf).
Snippet for SSL port number
# When we also provide SSL we have to listen to the
# standard HTTP port (see above) and to the HTTPS port
#
Listen 4443
##
## SSL Global Context

After change your port number, restart the service and now you can access your site with provide the port number as below.
http://localhost:8088/testingSite/index.php
Bind Date Time in Gridview
During development, when try to bind data to a date time control in gridview, it successfully insert data in DB from the date time control. When try to retrieve back from DB and bind it to the date time control. There is always an empty field. So here my solution.
At aspx page, add a control to hold the value and make it visible to false.
<asp:Label ID="lblDate" Text='<%#Eval("PurchaseDate", "{0:dd MMM yyyy}") %>' runat="server" Visible="false" />
When the page load or any action trigger the reload of the gridview, the RowDataBound will bound the data row by row. So that we can use RowDataBound method to bind the data from label to the date time control.
Below is the code behind snippet.
protected void GridView1_RowDataBound(object sender, GridViewRowEventArgs e)
{
if (e.Row.RowType == DataControlRowType.DataRow)
{
Label lblDate = (Label)e.Row.FindControl("lblDate");
DateTimeControl dtDate = (DateTimeControl)e.Row.FindControl("PurchaseDate");
if (!string.IsNullOrEmpty(lblDate.Text))
{
dtDate.SelectedDate = Convert.ToDateTime(lblDate.Text);
}
}
}
At aspx page, add a control to hold the value and make it visible to false.
<asp:Label ID="lblDate" Text='<%#Eval("PurchaseDate", "{0:dd MMM yyyy}") %>' runat="server" Visible="false" />
When the page load or any action trigger the reload of the gridview, the RowDataBound will bound the data row by row. So that we can use RowDataBound method to bind the data from label to the date time control.
Below is the code behind snippet.
protected void GridView1_RowDataBound(object sender, GridViewRowEventArgs e)
{
if (e.Row.RowType == DataControlRowType.DataRow)
{
Label lblDate = (Label)e.Row.FindControl("lblDate");
DateTimeControl dtDate = (DateTimeControl)e.Row.FindControl("PurchaseDate");
if (!string.IsNullOrEmpty(lblDate.Text))
{
dtDate.SelectedDate = Convert.ToDateTime(lblDate.Text);
}
}
}
Subscribe to:
Posts (Atom)